RestAPI

TIP
1 初始化 RestClient
2 创建索引库
3 删除索引库
4 判断索引库是否存在
5 总结
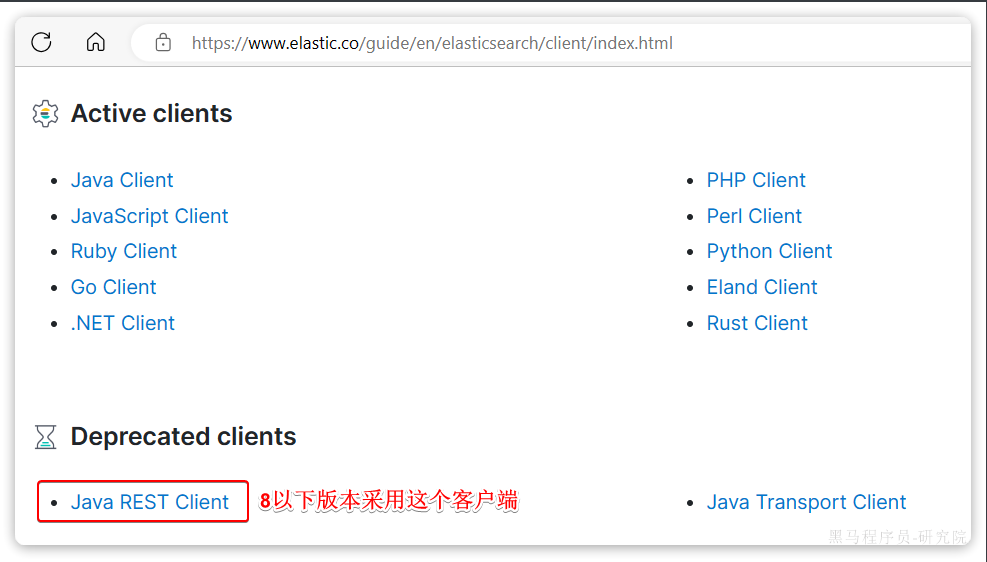
ES官方提供了各种不同语言的客户端,用来操作ES。这些客户端的本质就是组装DSL语句,通过http请求发送给ES。
官方文档地址:
https://www.elastic.co/guide/en/elasticsearch/client/index.html
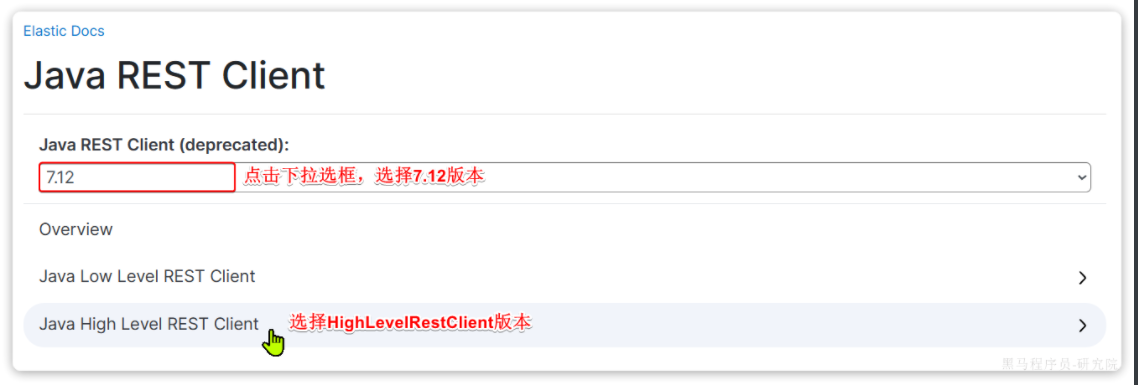
由于ES目前最新版本是8.8,提供了全新版本的客户端,老版本的客户端已经被标记为过时。而我们采用的是7.12版本,因此只能使用老版本客户端:
然后选择7.12版本,HighLevelRestClient版本:
1 初始化 RestClient
在elasticsearch提供的API中,与elasticsearch一切交互都封装在一个名为RestHighLevelClient的类中,必须先完成这个对象的初始化,建立与elasticsearch的连接。
分为三步:
1)在item-service模块中引入es的RestHighLevelClient依赖:
<dependency>
    <groupId>org.elasticsearch.client</groupId>
    <artifactId>elasticsearch-rest-high-level-client</artifactId>
</dependency>
2)因为SpringBoot默认的ES版本是7.17.10,所以我们需要覆盖默认的ES版本:
  <properties>
      <maven.compiler.source>11</maven.compiler.source>
      <maven.compiler.target>11</maven.compiler.target>
      <elasticsearch.version>7.12.1</elasticsearch.version>
  </properties>
3)初始化RestHighLevelClient:
初始化的代码如下:
RestHighLevelClient client = new RestHighLevelClient(RestClient.builder(
        HttpHost.create("http://192.168.150.101:9200")
));
这里为了单元测试方便,我们创建一个测试类IndexTest,然后将初始化的代码编写在@BeforeEach方法中:
package com.hmall.item.es;

import org.apache.http.HttpHost;
import org.elasticsearch.client.RestClient;
import org.elasticsearch.client.RestHighLevelClient;
import org.junit.jupiter.api.AfterEach;
import org.junit.jupiter.api.BeforeEach;
import org.junit.jupiter.api.Test;

import java.io.IOException;

public class IndexTest {

    private RestHighLevelClient client;

    @BeforeEach
    void setUp() {
        this.client = new RestHighLevelClient(RestClient.builder(
                HttpHost.create("http://192.168.150.101:9200")
        ));
    }

    @Test
    void testConnect() {
        System.out.println(client);
    }

    @AfterEach
    void tearDown() throws IOException {
        this.client.close();
    }
}
2 创建索引库
由于要实现对商品搜索,所以我们需要将商品添加到Elasticsearch中,不过需要根据搜索业务的需求来设定索引库结构,而不是一股脑的把MySQL数据写入Elasticsearch.
1.1 Mapping 映射
搜索页面的效果如图所示:

实现搜索功能需要的字段包括三大部分:
- 搜索过滤字段
- 分类
- 品牌
- 价格
- 排序字段
- 默认:按照更新时间降序排序
- 销量
- 价格
- 展示字段
- 商品id:用于点击后跳转
- 图片地址
- 是否是广告推广商品
- 名称
- 价格
- 评价数量
- 销量
对应的商品表结构如下,索引库无关字段已经划掉:
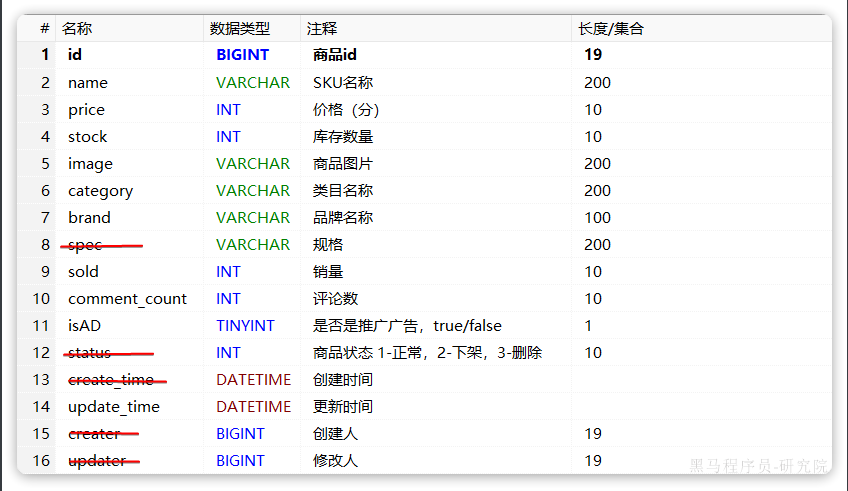
结合数据库表结构,以上字段对应的mapping映射属性如下:
| 字段名 | 字段类型 | 类型说明 | 是否****参与搜索 | 是否****参与分词 | 分词器 |
|---|---|---|---|---|---|
| id | long | 长整数 | —— | ||
| name | text | 字符串,参与分词搜索 | IK | ||
| price | integer | 以分为单位,所以是整数 | —— | ||
| stock | integer | 字符串,但需要分词 | —— | ||
| image | keyword | 字符串,但是不分词 | —— | ||
| category | keyword | 字符串,但是不分词 | —— | ||
| brand | keyword | 字符串,但是不分词 | —— | ||
| sold | integer | 销量,整数 | —— | ||
| commentCount | integer | 评价,整数 | —— | ||
| isAD | boolean | 布尔类型 | —— | ||
| updateTime | Date | 更新时间 | —— |
因此,最终我们的索引库文档结构应该是这样:
PUT /items
{
  "mappings": {
    "properties": {
      "id": {
        "type": "keyword"
      },
      "name":{
        "type": "text",
        "analyzer": "ik_max_word"
      },
      "price":{
        "type": "integer"
      },
      "stock":{
        "type": "integer"
      },
      "image":{
        "type": "keyword",
        "index": false
      },
      "category":{
        "type": "keyword"
      },
      "brand":{
        "type": "keyword"
      },
      "sold":{
        "type": "integer"
      },
      "commentCount":{
        "type": "integer",
        "index": false
      },
      "isAD":{
        "type": "boolean"
      },
      "updateTime":{
        "type": "date"
      }
    }
  }
}
1.2 创建索引
创建索引库的API如下:
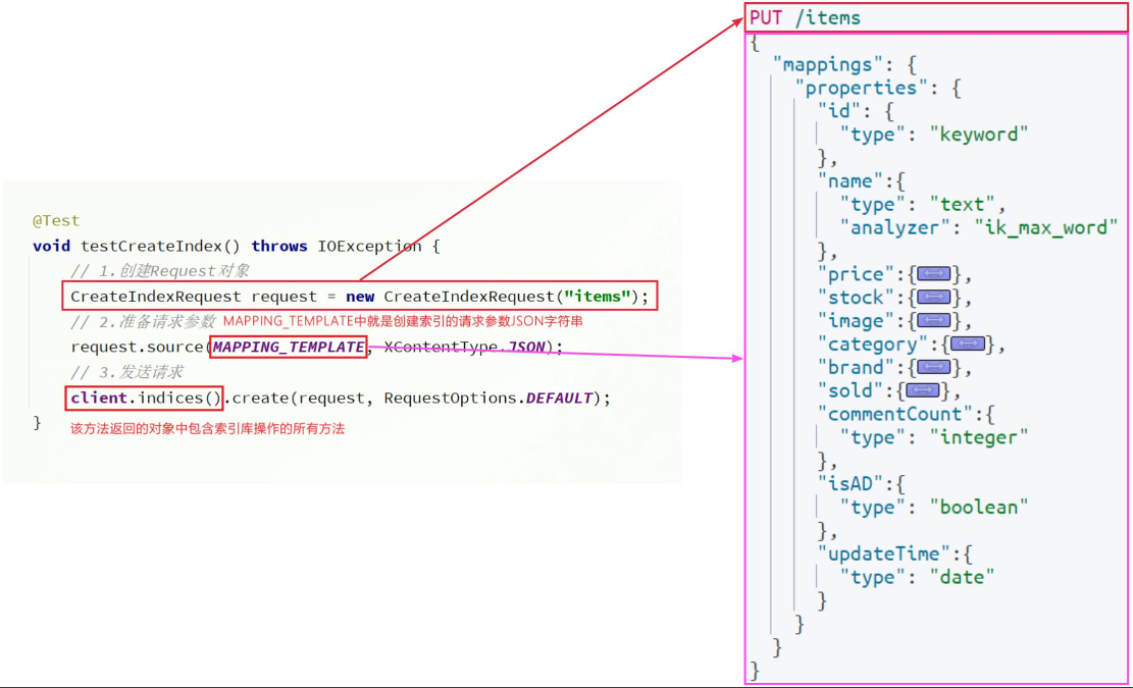
代码分为三步:
- 1)创建Request对象。
- 因为是创建索引库的操作,因此Request是
CreateIndexRequest。
- 因为是创建索引库的操作,因此Request是
- 2)添加请求参数
- 其实就是Json格式的Mapping映射参数。因为json字符串很长,这里是定义了静态字符串常量
MAPPING_TEMPLATE,让代码看起来更加优雅。
- 其实就是Json格式的Mapping映射参数。因为json字符串很长,这里是定义了静态字符串常量
- 3)发送请求
client.indices()方法的返回值是IndicesClient类型,封装了所有与索引库操作有关的方法。例如创建索引、删除索引、判断索引是否存在等
在item-service中的IndexTest测试类中,具体代码如下:
@Test
void testCreateIndex() throws IOException {
    // 1.创建Request对象
    CreateIndexRequest request = new CreateIndexRequest("items");
    // 2.准备请求参数
    request.source(MAPPING_TEMPLATE, XContentType.JSON);
    // 3.发送请求
    client.indices().create(request, RequestOptions.DEFAULT);
}

static final String MAPPING_TEMPLATE = "{\n" +
            "  \"mappings\": {\n" +
            "    \"properties\": {\n" +
            "      \"id\": {\n" +
            "        \"type\": \"keyword\"\n" +
            "      },\n" +
            "      \"name\":{\n" +
            "        \"type\": \"text\",\n" +
            "        \"analyzer\": \"ik_max_word\"\n" +
            "      },\n" +
            "      \"price\":{\n" +
            "        \"type\": \"integer\"\n" +
            "      },\n" +
            "      \"stock\":{\n" +
            "        \"type\": \"integer\"\n" +
            "      },\n" +
            "      \"image\":{\n" +
            "        \"type\": \"keyword\",\n" +
            "        \"index\": false\n" +
            "      },\n" +
            "      \"category\":{\n" +
            "        \"type\": \"keyword\"\n" +
            "      },\n" +
            "      \"brand\":{\n" +
            "        \"type\": \"keyword\"\n" +
            "      },\n" +
            "      \"sold\":{\n" +
            "        \"type\": \"integer\"\n" +
            "      },\n" +
            "      \"commentCount\":{\n" +
            "        \"type\": \"integer\"\n" +
            "      },\n" +
            "      \"isAD\":{\n" +
            "        \"type\": \"boolean\"\n" +
            "      },\n" +
            "      \"updateTime\":{\n" +
            "        \"type\": \"date\"\n" +
            "      }\n" +
            "    }\n" +
            "  }\n" +
            "}";
3 删除索引库
删除索引库的请求非常简单:
DELETE /hotel
与创建索引库相比:
- 请求方式从PUT变为DELTE
- 请求路径不变
- 无请求参数
所以代码的差异,注意体现在Request对象上。流程如下:
- 1)创建Request对象。这次是DeleteIndexRequest对象
- 2)准备参数。这里是无参,因此省略
- 3)发送请求。改用delete方法
在item-service中的IndexTest测试类中,编写单元测试,实现删除索引:
@Test
void testDeleteIndex() throws IOException {
    // 1.创建Request对象
    DeleteIndexRequest request = new DeleteIndexRequest("items");
    // 2.发送请求
    client.indices().delete(request, RequestOptions.DEFAULT);
}
4 判断索引库是否存在
判断索引库是否存在,本质就是查询,对应的请求语句是:
GET /hotel
因此与删除的Java代码流程是类似的,流程如下:
- 1)创建Request对象。这次是GetIndexRequest对象
- 2)准备参数。这里是无参,直接省略
- 3)发送请求。改用exists方法
@Test
void testExistsIndex() throws IOException {
    // 1.创建Request对象
    GetIndexRequest request = new GetIndexRequest("items");
    // 2.发送请求
    boolean exists = client.indices().exists(request, RequestOptions.DEFAULT);
    // 3.输出
    System.err.println(exists ? "索引库已经存在!" : "索引库不存在!");
}
5 总结
索引库准备好以后,就可以操作文档了。为了与索引库操作分离,我们再次创建一个测试类,做两件事情:
- 初始化RestHighLevelClient
- 我们的商品数据在数据库,需要利用IHotelService去查询,所以注入这个接口
package com.hmall.item.es;

import com.hmall.item.service.IItemService;
import org.apache.http.HttpHost;
import org.elasticsearch.client.RestClient;
import org.elasticsearch.client.RestHighLevelClient;
import org.junit.jupiter.api.AfterEach;
import org.junit.jupiter.api.BeforeEach;
import org.springframework.beans.factory.annotation.Autowired;
import org.springframework.boot.test.context.SpringBootTest;

import java.io.IOException;

@SpringBootTest(properties = "spring.profiles.active=local")
public class DocumentTest {

    private RestHighLevelClient client;
    @Autowired
    private IItemService itemService;

    @BeforeEach
    void setUp() {
        this.client = new RestHighLevelClient(RestClient.builder(
                HttpHost.create("http://192.168.150.101:9200")
        ));
    }

    @AfterEach
    void tearDown() throws IOException {
        this.client.close();
    }
}